Structural Interventions
Structural heart interventions involve procedures that correct abnormalities of the heart's structures, such as
valves and walls, using minimally invasive techniques
Transcatheter Aortic Valve Replacement (TAVR)
TAVR is a minimally invasive procedure to replace a diseased aortic valve, namely, aortic valve stenosis..
Valve Systems
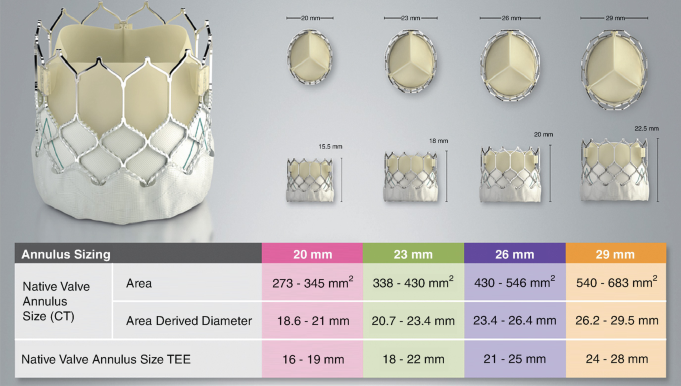
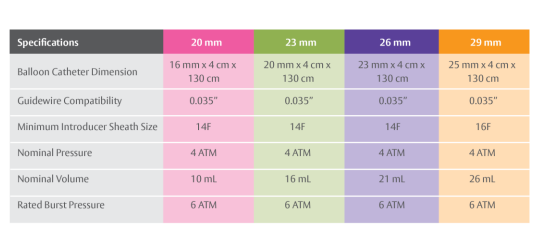
- Edwards Sapien Valve:
- Sizes: Available in 23mm, 26mm, and 29mm diameters.
- Medtronic CoreValve:
- Sizes: Available in 23mm, 26mm, and 29mm, and 31mm diameters.
Procedure Overview
- Preparation: Patient evaluation and imaging to determine suitability. Imaging includes CTA of thorax and abdomen/pelvis, echocardiogram, and a coronary angiogram
- Access: Typically via the femoral artery in the groin however choose most appropriate access site based on individual patient anatomy based on degree of calcification and vessel diameter.
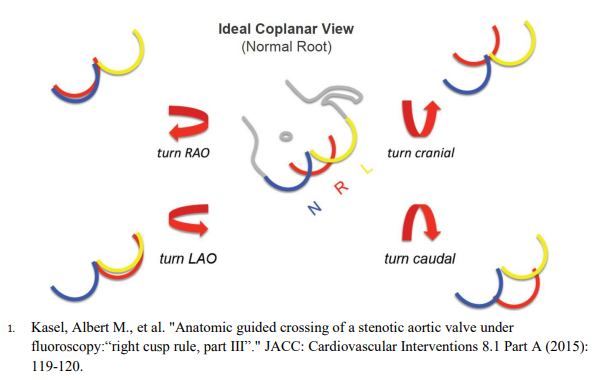
- Procedure entails at least 2 arterial access sites and 1 venous access site. Venous access is used for placement of transvenous pacer wire into the right ventricular apex (exception if pacing is being performed via left ventricular wire). Arterial acess other than TAVR site access is used to image coronaries (if not done prior) and to place a pigtail catheter in the right coronary cusp for coplanar view (ideal coplanar view can be obtained by making modifications as detailed in above graphic)
- Post-Valve deployment: Monitor for rhythm changes most notably various degrees of heart blocks and escape rhythms. Monitor for pericardial effusion. Ensure coronaries opacify with repeat aortic root angiogram. Lastly, check for paravalvular leak and assess need for further valve expansion.
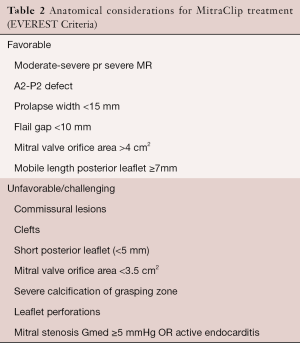
Mitral Transcatheter Edge-to-Edge Repair (TEER)
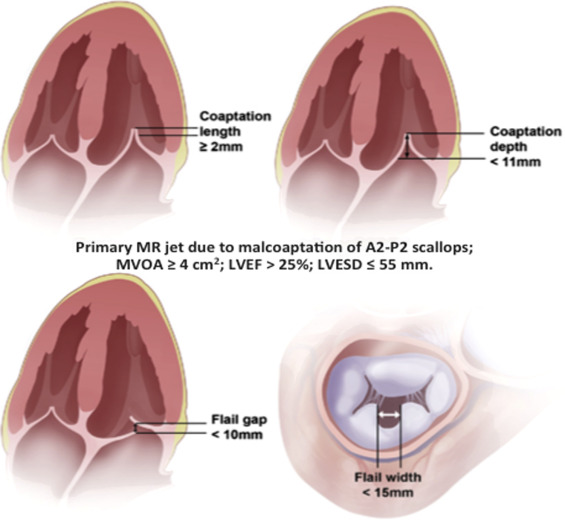
Mitral TEER is a minimally invasive procedure aimed at repairing mitral regurgitation by approximating the mitral valve leaflets using a clip device.
Equipment Available
- MitraClip System:
- Clip Sizes:
- NT: Standard width and length
- NTW: Wider clip arms for larger coaptation area
- XT: Longer clip arms for deeper grasp
- XTW: Wider and longer clip arms
- Steerable Guide Catheter
- Clip Delivery System
- Clip Sizes:
- PASCAL Repair System:
- Device Types:
- PASCAL: Broad paddles for enhanced leaflet capture
- PASCAL Ace: Narrower profile for precise leaflet capture
- Steerable Catheter and Guide Sheath
- Independent Grasping Mechanism
- Elongated Nitinol Implant with Central Spacer
- Device Types:
- Imaging Equipment:
- Transesophageal Echocardiography (TEE) with 3D capability
- Fluoroscopy System
Procedure Guidance
- Obtain venous access via the right femoral vein using ultrasound guidance.
- Advance a transseptal sheath to the superior vena cava.
- Perform transseptal puncture under TEE and fluoroscopic guidance to access the left atrium.
- Introduce the steerable guide catheter into the left atrium.
- For MitraClip:
- Advance the MitraClip Clip Delivery System through the guide catheter.
- Manipulate the device to align perpendicular to the mitral valve coaptation line.
- Open the clip arms and position them above the mitral leaflets.
- Simultaneously grasp both anterior and posterior leaflets under real-time TEE guidance.
- Partially close the clip and assess mitral regurgitation reduction.
- Fully close and deploy the clip if satisfactory results are achieved.
- For PASCAL:
- Advance the PASCAL Repair System through the steerable catheter.
- Utilize the device's steerability to align with the mitral valve coaptation line.
- Open the clasps and paddles to prepare for leaflet capture.
- Use the independent grasping mechanism to grasp leaflets individually if needed.
- The central spacer aids in filling the regurgitant orifice.
- Close the clasps and assess mitral regurgitation reduction via TEE.
- Implant the device upon achieving optimal results.
- Multiple devices may be used if necessary to achieve optimal reduction of mitral regurgitation.
- After satisfactory deployment, remove the delivery system and sheath.
- Achieve hemostasis at the access site using closure devices or manual compression.
- Monitor the patient for complications such as mitral stenosis, leaflet damage, or pericardial effusion.
TriClip Transcatheter Tricuspid Valve Repair
TriClip is a transcatheter edge-to-edge repair system for treating tricuspid regurgitation by clipping the tricuspid valve leaflets.
Equipment Available
- TriClip Delivery System:
- Clip Sizes: NT, XT (longer arms for larger grasping area)
- Steerable Guide Catheter
- Clip Delivery System with Enhanced Steering
- Imaging Equipment:
- Transesophageal Echocardiography (TEE) with 3D capability
- Fluoroscopy System
Procedure Guidance
- Administer general anesthesia and insert a TEE probe for imaging.
- Obtain venous access via the right femoral vein using ultrasound guidance.
- Advance the steerable guide catheter to the right atrium under fluoroscopic and TEE guidance.
- Navigate the guide catheter across the tricuspid valve if necessary.
- Introduce the clip delivery system through the guide catheter.
- Manipulate the TriClip device to grasp the tricuspid valve leaflets under real-time 3D TEE guidance.
- Assess clip positioning and tricuspid valve function before deploying the clip.
- Multiple clips may be used to achieve optimal reduction in regurgitation.
- After satisfactory deployment, remove the delivery system and guide catheter.
- Achieve hemostasis at the access site using closure devices or manual compression.
- Monitor the patient for potential complications such as arrhythmias or right ventricular injury.
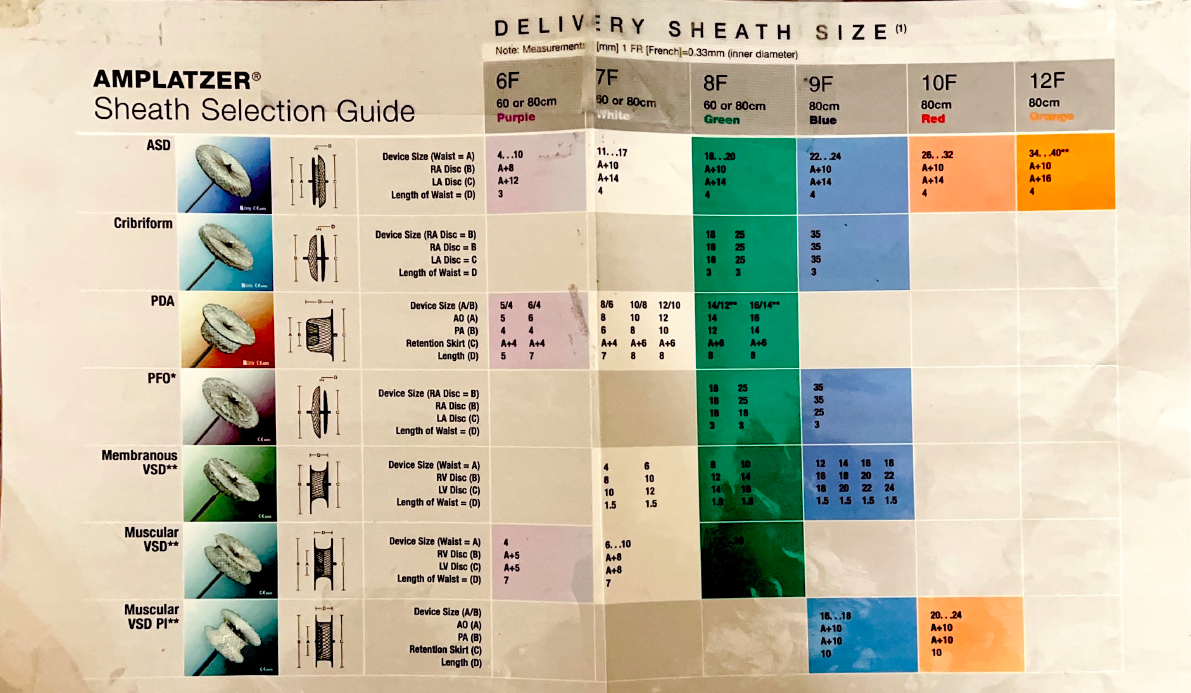
PFO/ASD Closure
PFO/ASD closure is performed to prevent paradoxical emboli and reduce the risk of stroke by sealing the interatrial communication.
Equipment Available
- Closure Devices:
- Amplatzer™ PFO Occluder:
- Sizes: 18mm, 25mm
- Amplatzer™ Septal Occluder:
- Sizes: 4mm to 38mm (various sizes for ASD closure)
- GORE® HELEX® Septal Occluder:
- Sizes: 15mm, 20mm, 25mm, 30mm, 35mm
- Flexible, biocompatible device made of ePTFE material
- Amplatzer™ PFO Occluder:
- Delivery Systems:
- Amplatzer TorqVue Delivery Sheath (6 Fr to 12 Fr depending on device size)
- GORE® Delivery Catheter for HELEX® (9 Fr to 11 Fr)
- Amplatzer Stiff Wire Guidewire
- Imaging Equipment:
- Transesophageal Echocardiography (TEE)
- Fluoroscopy System
Procedure Guidance
- Administer moderate sedation and insert a TEE probe for imaging guidance.
- Obtain venous access via the right femoral vein using ultrasound guidance.
- Deploy a Perclose ProGlide closure device for venous access site management.
- Advance a 6 Fr multipurpose diagnostic catheter over a 0.035" J-wire into the right atrium.
- Traverse the PFO/ASD with the catheter under TEE and fluoroscopic guidance.
- Advance a stiff guidewire (e.g., Amplatzer Stiff Wire) into the left upper pulmonary vein.
- Remove the diagnostic catheter and advance an appropriate-sized delivery sheath over the wire into the left atrium.
- Prepare and load the selected occluder device into the delivery system:
- For Amplatzer Devices: Use the TorqVue delivery system.
- For HELEX Device: Use the GORE® Delivery Catheter System.
- Advance the device to the PFO/ASD site and deploy under TEE and fluoroscopic guidance:
- HELEX Deployment:
- Deploy the left atrial disc first.
- Retract to appose the septum, then deploy the right atrial disc.
- The HELEX device's flexible design allows for conforming to the septal anatomy.
- Amplatzer Deployment: Similar steps with respective devices.
- HELEX Deployment:
- Confirm proper device positioning, stability, and absence of residual shunt via TEE.
- Release the device according to manufacturer instructions:
- HELEX Device: Detach using the delivery system's release mechanism.
- Amplatzer Device: Detach by counterclockwise rotation of the delivery cable.
- Remove the delivery system and achieve hemostasis at the access site using the pre-placed closure device and manual compression if necessary.
- Monitor the patient for complications such as arrhythmias, pericardial effusion, or device embolization.
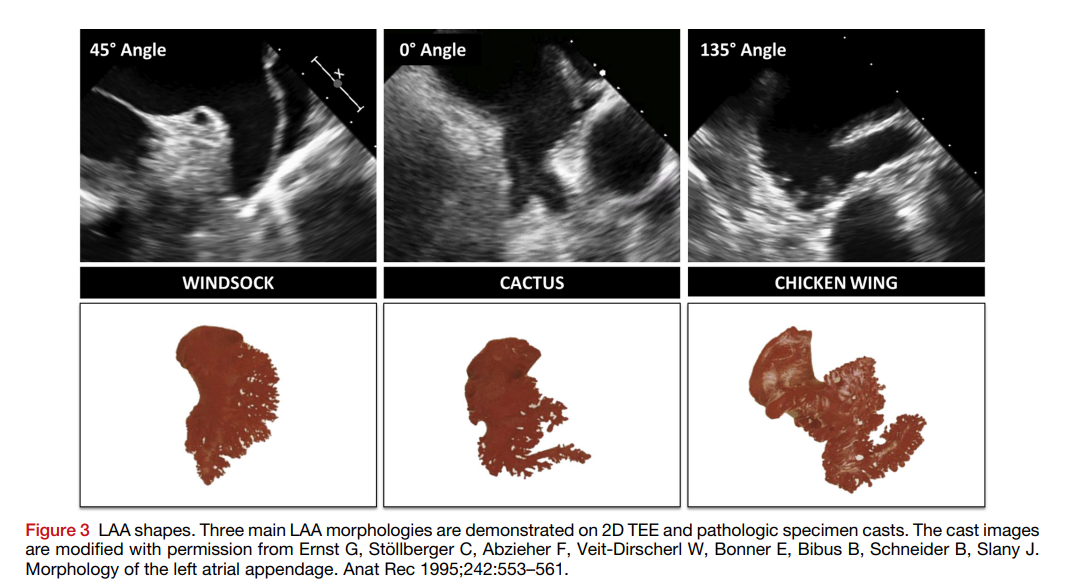
Left Atrial Appendage Occlusion (LAAO)
LAAO aims to reduce stroke risk in patients with atrial fibrillation by sealing off the left atrial appendage.
Equipment Available
- Occlusion Devices:
- WATCHMAN FLX:
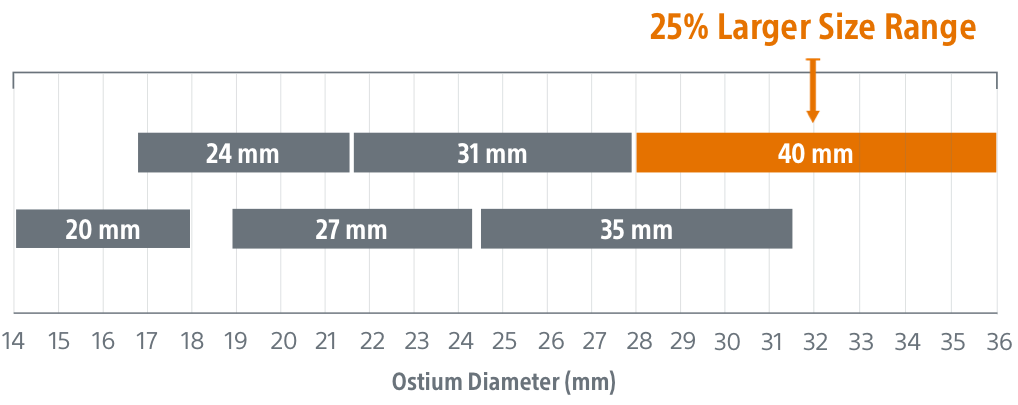
- Sizes: 20mm, 24mm, 27mm, 31mm, 35mm, and 40mm
- Amplatzer Amulet:
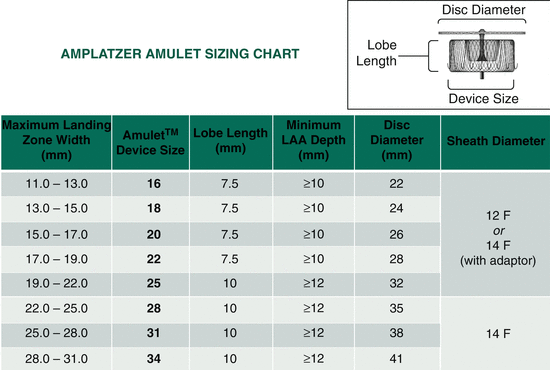
- Sizes: 16mm to 34mm (in 2mm increments)
- Dual-seal mechanism with lobe and disc design
- WATCHMAN FLX:
- Access and Delivery Systems:
- For WATCHMAN FLX:
- WATCHMAN Access System with Double Curve or Single Curve Sheath
- VersaCross RF Transseptal System
- For Amplatzer Amulet:
- Amplatzer Steerable Delivery Sheath (12 Fr or 14 Fr)
- Amplatzer Guidewire
- For WATCHMAN FLX:
- Imaging Equipment:
- Transesophageal Echocardiography (TEE)
- Fluoroscopy System
Procedure Guidance
- Administer general anesthesia and insert a TEE probe for intra-procedural imaging.
- Gain venous access via the right femoral vein using the modified Seldinger technique.
- Deploy a Perclose ProGlide closure device for venous access site management.
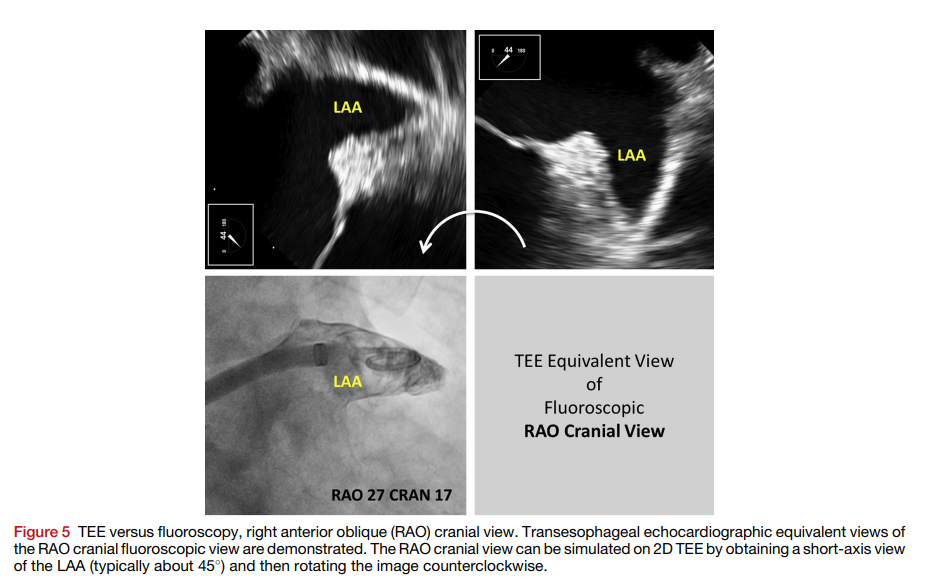
- Perform transseptal puncture under TEE and fluoroscopic guidance to access the left atrium (mid posterior on short axis and inferior on bicaval views).
- Heparinize the patient to maintain an ACT > 250 seconds.
- Device Preparation and Deployment:
- For WATCHMAN FLX:
- Advance the WATCHMAN FLX Access Sheath into the left atrium over a stiff guidewire.
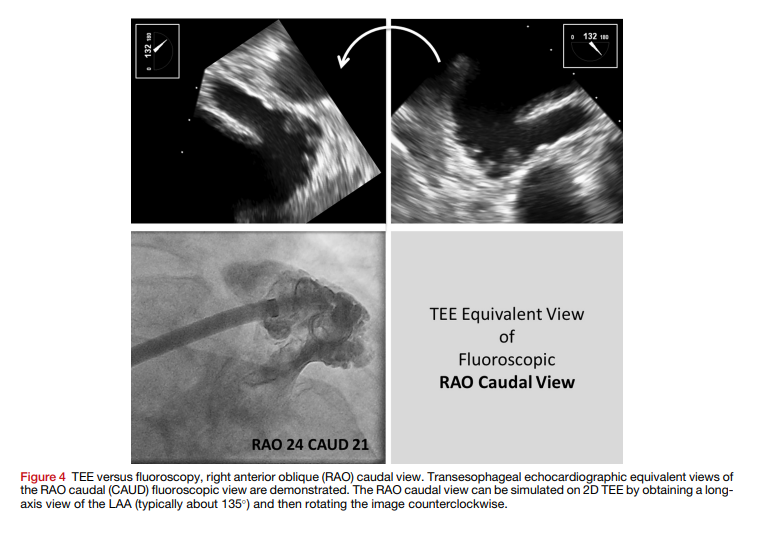
- Position the sheath in the left atrial appendage (LAA) under TEE and fluoroscopic guidance.
- Perform LAA angiography and measure dimensions to select appropriate device size.
- Prepare and load the selected WATCHMAN FLX device onto the delivery system.
- Advance the device into the LAA and deploy it by retracting the sheath.
- Confirm proper device position and stability using the PASS criteria (Position, Anchor, Size, Seal).
- Release the device once satisfactory positioning is confirmed.
- For Amplatzer Amulet:
- Exchange the transseptal sheath for the Amplatzer Steerable Delivery Sheath.
- Advance the delivery sheath into the LAA over a guidewire.
- Perform LAA angiography and TEE measurements to select the appropriate device size.
- Prepare and load the selected Amplatzer Amulet device onto the delivery cable.
- Advance the device into the LAA and deploy the distal lobe by unsheathing it.
- Stabilize the lobe within the LAA and deploy the proximal disc to cover the orifice.
- Confirm device position, compression, and seal using TEE and fluoroscopy.
- Perform a tug test to ensure device stability before release.
- Release the device by rotating the delivery cable counterclockwise.
- For WATCHMAN FLX:
- After device deployment:
- Assess for peridevice leaks using color Doppler on TEE.
- Check for any device-related complications such as pericardial effusion or thrombus formation.
- Remove all catheters and sheaths, and achieve hemostasis using the pre-placed closure device and manual compression if necessary.
- Monitor the patient for any complications post-procedure.
